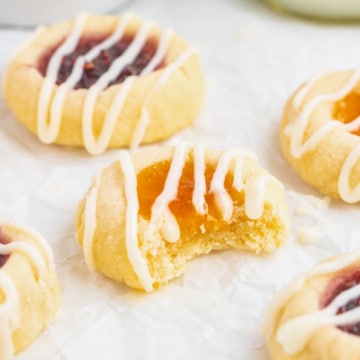
Thumbprint Cookies with Icing
Thumbprint cookies with icing have been a beloved treat for generations, and for good reason. With soft and buttery dough, your favorite jams or preserves, and delicious frosting, these shortbread cookies are a great treat to serve to your friends and family!
Print
Pin
Servings: 24 cookies (approximately)
Calories: 158kcal
Equipment
- Electric Hand Mixer or Stand Mixer
- Dry Measuring Cups
- Baking Sheets
Ingredients
Thumbprint Cookies
- 1 cup butter cold from the refrigerator and cut into cubes
- ⅔ cups granulated sugar
- 1 large egg
- 1 teaspoon vanilla extract
- ½ teaspoon kosher salt
- 2 teaspoons cornstarch
- 2 ¼ cups all-purpose flour
- ½ cup jam or preserves raspberry, apricot, strawberry, cherry or blueberry
Icing
- ½ cup powdered sugar
- ½ teaspoon vanilla extract or almond extract
- 2-3 teaspoons milk or heavy cream
Instructions
Thumbprint Cookies
- Make the dough by creaming the cold butter that is cut into cubes and sugar in a mixer for about 1 minute until light and fluffy.
- Add egg, vanilla, and salt, and mix for another minute.
- With the mixer on low speed add the cornstarch and gradually add the flour to the bowl of the mixer, but be careful not to overmix. The mixture should come together within a minute into a soft pliable dough and be firm with no streaks of flour.
- Line baking sheets with parchment paper and then roll the dough into 1 tablespoon balls and place them on the parchment-lined sheet with about 2" of space in between. Note: When baking be sure not to overcrowd the pan to allow for adequate air to flow through the baking sheet and to cook all cookies evenly.
- Form a 1 ½" diameter depression in each cookie using your thumb, a spoon, or a wooden utensil. I recommend using a rounded measuring spoon for uniform indentations that also gently flatten the cookie to maintain a consistent shape. Be cautious not to press too hard to prevent creating a hole in the bottom of the dough, ensuring the jam stays securely in place.
- To fill the cookies, take the jam and put it in a Ziplock or piping bag and pipe about ½-teaspoon of jam into each cookie's dent. You can also use a spoon to fill the cookies, but it can be a bit messy, so I recommend using a bag to pipe in the jam.
- Chill the cookies on the sheet pan for 30 minutes.
- While the cookies are chilling, preheat the oven to 350ºF, with the rack right in the center.
- Bake one tray at a time for 11-13 minutes until lightly browned around the edges.
- Allow the cookies to rest on the pan for 5 minutes, then transfer them to a wire rack to cool completely.
Icing
- Combine the powdered sugar, extract, and milk into a small bowl and mix together until the desired texture is reached. You can check this by taking a spoonful from the bowl and drizzling it back into the glaze. The drizzle glaze should leave a trail in the bowl. If the mixture is too thick you may need to add additional milk. If it is too thin, then add additional powdered sugar.
- You can either drizzle the glaze over them using a spoon or use a piping bag for a more precise application. Then enjoy your delicious cookies!
Notes
General
- The cookies can be made with a hand mixer following the directions above. When adding the flour, you may need to turn off the mixer and add flour in 3 batches. Turn on and mix slowly to combine each batch of flour. You may also finish mixing the dough with a spatula until the dough comes together.
- For this recipe raspberry and apricot preserves were used to fill the cookies. These are the more traditional flavors, but you can fill them with any of your favorite jams or preserves. I recommend using high-quality jams to make these cookies shine.
- Use cold butter to cream the sugar with cookies. This helps to form the cookies into balls and have a smaller chill time after forming. If using room-temperature butter, you may need to chill your cookies for an hour before baking.
- I recommend chilling the dough in the refrigerator after filling it with jam. You can do it without chilling, but the cookies may spread.
- The glaze is completely optional. Taste testers in the recipe loved the cookies both ways.
- If your cookies are spreading too much or the dough is too moist to form into balls, try adding additional flour. You can add up to an additional ¼ cup flour but try to avoid adding if possible. Adding more flour can result in a crumbly cookie.
- The cornstarch is optional but helps to create a soft and tender cookie texture.
- Fridge: Cookies are good on the counter for 5 days. For extended freshness, you can store the cookies in the refrigerator. Place them in an airtight container with parchment paper between layers to prevent sticking. They will stay fresh for up to 2 weeks.
- Freezer: To freeze thumbprint cookies, place them in a single layer on a baking sheet and freeze until solid. Transfer the cookies to an airtight container or zip-top freezer bag with parchment paper between layers. They can be frozen for up to three months.
- Reheating: If you’re reheating frozen cookies, thaw them at room temperature for about an hour or two. If you prefer a warm cookie, you can gently warm them in the oven and at 300°F (150°C) for 8-10 minutes.
Nutrition
Calories: 158kcal | Carbohydrates: 20g | Protein: 2g | Fat: 8g | Saturated Fat: 5g | Polyunsaturated Fat: 0.4g | Monounsaturated Fat: 2g | Trans Fat: 0.3g | Cholesterol: 27mg | Sodium: 114mg | Potassium: 22mg | Fiber: 0.3g | Sugar: 10g | Vitamin A: 257IU | Vitamin C: 0.4mg | Calcium: 7mg | Iron: 1mg